
How To Fix Running into iTunes Error 14?
iTunes is the best option when you upgrade to the latest iOS or iPadOS. But, sometimes, you run into errors such as iTunes error 14 during your upgrade or a restore. This error is, happily, easily solved with few steps!
If, when your upgrade method, you find a notification saying, “This iPhone could not be restored. An unknown error happened (14),” we have a pair of solutions for you.
According to Apple, this critical error is most commonly caused by issues with your USB cable. Additionally, our users report that iTunes error 14 is often caused by a defective firmware update file. Now check your device’s USB connection, the USB cable (Lightning), and your computer’s and power strip’s USB port for any obstacles.
Why does my device get error 14?
You look at error 14 when restoring or upgrading your iOS with iTunes. There are many various reasons for this error, including:
Take Our Newsletter With Apple Tips and Breaking News
- USB cable fault or problems
- Using an old version of iTunes
- Firmware errors or corruption
- Low storage or memory on your device
- Unstable network connections
iTunes Error 14 Caused with Lightning USB Cable
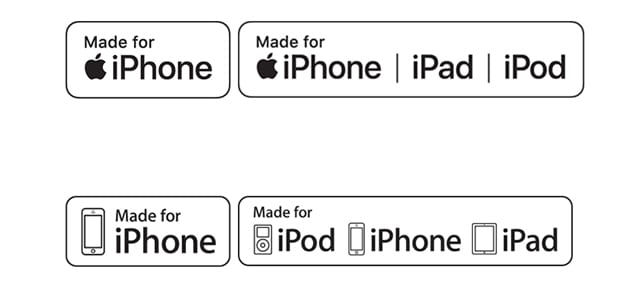
Make sure you use Made For iPod/iPhone/iPad cables and charging devices.
Look for the Made for iPhone, Made for iPod, and Made for iPad logos on your products. This logo assures that the accessory was designed to connect to iPod, iPhone, or iPad and certified to join Apple performance standards.
To diagnose if an issue exists by your USB cable, try the following steps, also check if the error happens again.
- Utilize the original Apple Lightning USB cable that brought your iDevice
- As computers, don’t plug in a USB port on your keyboard–plug directly into the computer
- Try the different USB port on your computer
- Use different Lightning USB cable if available
- Test your Lightning USB cable on different computer

Update to the Latest iTunes Version
If you yet to get iTunes error 14, verify that you have the latest update of iTunes.
- Open iTunes and look if it prompts you to update to a new version
- Follow these steps and update to the latest iTunes software
Try connecting your device again and view if that worked for you.
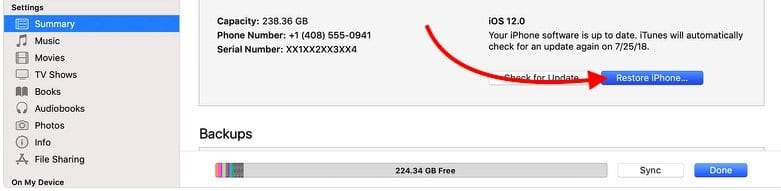
Error 14 can expect that your device’s memory is full. Try restoring your device through iTunes instead of updating it. If it doesn’t work first, press the Option Key (Mac) or Shift Key (Windows) and then choose Restore.
iTunes Error 14 Caused with Unsuccessful Firmware File
If iTunes isn’t recognizing the IPSW file and an update isn’t working, deleting the IPSW file from your PC forces iTunes to download a new IPSW file the next time you try to update.
In unusual situations, the upgrade file for your device was not successfully downloaded. If so, this may be creating the error 14. If a restore issue is particular to a user, it’s likely due to an unusable .ipsw file. iTunes does these IPSW files to restore your device.
If you are going iTunes error 14, those IPSW files may be unusable. Then try deleting them, renaming them, or running the file to a different directory.
Removing this IPSW file causes iTunes to download a new copy of the IPSW.
IPSW files on Macs
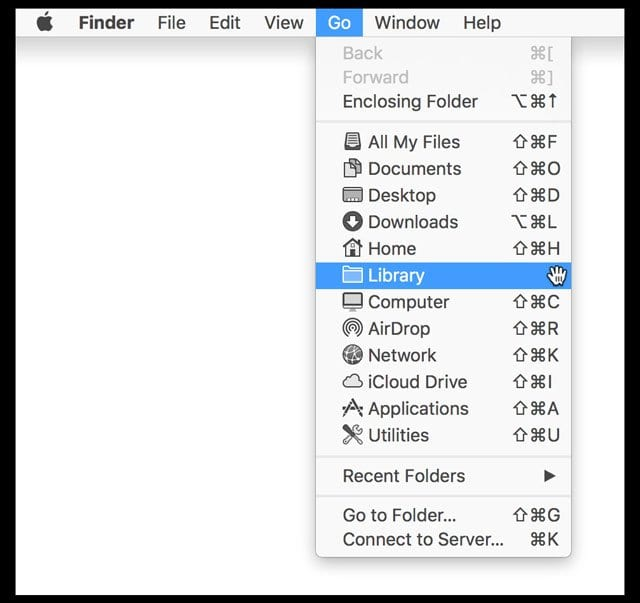
An easy method to find the ipsw file location on your Mac is by Finder.
- Tap open Finder in your dock or hold down that Option key
- Choose Go from the Top Menu
- Select Library
- If you don’t hold down that Option key, you won’t notice the Library option
- Open the Library’s iTunes folder
- Look for a folder called iPad/iPodi/Phone
- Software Updates
Manually locate your Mac’s IPSW file.
- iPhone~/Library/iTunes/iPhone Software Updates
- iPad~/Library/iTunes/iPad Software Updates
- iPod touch~/Library/iTunes/iPod Software Updates
Notes: The tilde “~” represents your Home directory.
If you can’t look at your user library, follow these steps to show it.

To locate the IPSW file at Windows depends on which Windows version, username, and iOS hardware you use
We recommend you open Windows File Explorer, type “*.ipsw” into the search field, and make sure you are searching your whole PC.
Then find and delete these iOS update files in iTunes in .ipsw format. Or research for.IPSW files in your /Users directory while you have longer than one user account.
IPSW files on Windows 8-10
- \Users\USERNAME\AppData\Roaming\Apple Computer\iTunes\
Note: To fast access the AppData folder, click Start, type %appdata% in the search bar, and press the Return key. Windows 8: Go the cursor to the upper right, click this magnifying glass, type %appdata%, next press this Return key.
IPSW files on Windows Vista and 7
- \Users\username\AppData\Roaming\iTunes\iPhone\Apple Computer (iPad or iPod) Software Updates
Summary: To instantly access the AppData folder, click the Start button, type %appdata% in the search bar, next press this Return key
IPSW files on Windows XP
- Settings And Documents /[username]/Application Data/Apple Computer/iTunes/iPhone (iPad and iPod) Software Updates
Note: To fast access the Application Data folder, choose Start > Run. Type %appdata% and click OK.
Follow these methods once you delete or move the .ipsw file:
- Close iTunes on your PC
- Now open iTunes again on your PC
- Check the you deleted the .ipsw (iOS upgrade file) file by going to System Drive> User> Username> Apple Com> App Data> iTunes> iPhone Software Updates–delete anything where if required
- If connecting your iPad or iPad, follow these same paths but after opening the iTunes folder, go to iPad Software Updates and iPod Software Updates
- Restore and Upgrade your iDevice with the following iTunes prompts
You should no large get iTunes error 14. Your iPhone and iPad should successfully restore and upgrade to the latest iOS.
Manually choose the IPSW file in iTunes.
If you try deleting the ipsw file and failed, let’s instead manually choose which IPSW file you need iTunes to use.
- For Macs, hold down Option Key
- In Windows, press the Shift Key
- Press this Restore button
- Select the IPSW file you need to install
If remove the .ipsw file didn’t fix your restore issue, then the problem is probably made with another user-specific setting. That involves any third-party security software settings and your iTunes choices.
Where to see IPSW files for my iPhone, iPad, and iPod Touch
Apple releases the new IPSW files in iTunes. So if you want the latest iOS, use iTunes.
However, if your device uses earlier versions, find these outdated IPSW downloads at sites such as this one.
Now Download an ipsw file and restore your iPhone, iPad, and iPod with that file
- Move to the ipsw download the iOS version that did at your iPad
- First Make sure you download an Apple signed IPSW version
- NEXT, Open iTunes
- Next, Connect your iPad to iTunes
- Till wait for the Recovery Message to see in iTunes with options to Update or Restore
- Press and hold the Option key, next choose the Update button with the option key still pressed
- Locate that ipsw file you downloaded and choose it
- Please wait for your iPad to restore to its iOS version
iTunes Error Caused by Third-Party Security Software
If none of these solutions above fix the error, check to see if any third-party security software might cause the problem. Third-party security software often prevents Apple iDevices from restoring, upgrading, or back up by not providing connections to Apple servers.
So try and temporarily deactivate any third-party security software and check if iTunes error 14 error stops providing your iDevice to upgrade or restore.
Summary
Utilizing iTunes to upgrade to the latest iOS is good practice–make sure you backup first!
But, if problems continue after trying to update, upgrade via WiFi instead of iTunes. Ensure you have a great WiFi connection and check that your iDevice’s battery has at least 50% power. If fewer than 50% charged, connect your iPhone, iPad, or different iDevice to a power source and start the upgrade. With a very fast and reliable WiFi connection, your upgrade is seamless and quick.


