
How to use Jira Software Tool for Beginners: JIRA Tutorial
What is JIRA?
JIRA is a tool produced by Australian Company Atlassian. The software is used for bug tracking, issue tracking, and project management. The name “JIRA” is derived from the Japanese word “Gojira,” which means “Godzilla.” This tool’s primary use is to track issues and bugs related to your software and Mobile apps.
It is also done for project management. The JIRA dashboard consists of several useful functions and features which make handling of problems easy. Some of the key features are noted here. Let’s read How to use Jira Software Tool for Beginners JIRA Defect and Project tracking software with this Training Course.
How to use Jira Software Tool for Beginners
How to Use Jira?
In this Jira tutorial for newcomers, you will read below how to use Jira Software Tool for Beginners:
JIRA Scheme
Inside the JIRA scheme, everything can be configured, and it consists of
- Workflows
- Issue Types
- Custom Fields
- Screens
- Field Configuration
- Notification
- Permissions
JIRA Issues and Issue types
That section will guide you through the JIRA Software Issue and its types.
What is JIRA Issue?
JIRA issue would track bug or problem that underlies the project. Once you have imported the project, then you can create problems.
Following Issues, you will find other useful features like
- Issue Types
- Workflow’s
- Screens
- Fields
- Issue Attributes
Let discuss JIRA Issue in detail.
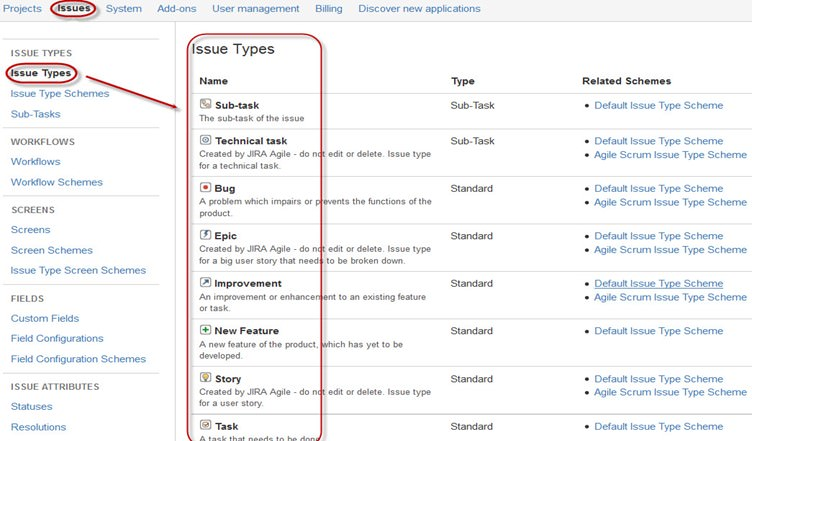
Issue Types
Issue Type represents all types of items that can be created and tracked via JIRA. JIRA Issues are classified following various forms like the new feature, sub-task, bug, etc., as shown in the screenshot.
There are two kinds of Issue types schemes into JIRA. One is
- Default Issue Type Scheme: In the default issue type scheme, all newly created issues will be added automatically to the scheme
- Agile Scrum Issue Type Scheme: Issues and plan connected with Agile Scrum will use this scheme
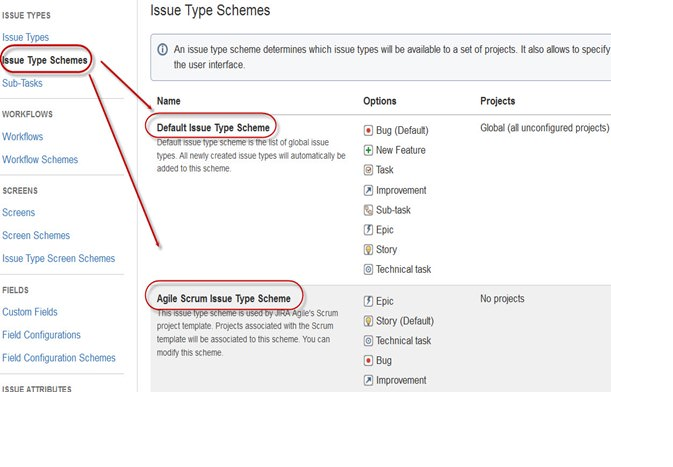
Aside from these two issue type schemes, you can also add schemes manually as per requirement. For example, we have created an IT & Support scheme. To these, we will drag and drop the issue types from the Available Issue type to the Issue type for the current scheme, as shown in the screenshot here.
JIRA Components
Components are sub-sections from a project; they are related to group issues into shorter parts. Elements add some structures to the projects, developing them into features, modules, teams, subprojects, etc. Using details, you can create reports, collect statistics, and display them on dashboards, and so on.
As shown in the earlier screen, you can add a name, description, component lead, and default assignee to add new components.
JIRA screen
If the issue is created in JIRA, it will be provided and represented into different fields, the display of the field in JIRA is recognized as a screen. This field can be transitioned and edited by a workflow. To each issue, you can select the screen type as shown in the screen-shot. To add or associate an issue operation by a screen, you have to go in the main menu and click on Issues, when clicking on Screen Schemes and then click on “Associate an issue operation by a screen” and add the screen equally the condition.
Issue Attributes
Issue Attributes encompasses
- Statuses
- Resolutions
- Priorities
Statuses: Various statuses are used to indicate the progress of a project like To do, Open, Closed, InProgress, ReOpened, and Resolved. Furthermore, you have resolutions and priorities, in solution, it again tells about the progress of problem like Fixed, Won’t be Fixed, Duplicate, Incomplete, Cannot reproduce, Advanced also you can set the preferences of the issue whether a situation is critical, major, minor, blocker and Trivial.
Issue Security Schemes
The function in JIRA allows you to control who can see the issues. It consists of some security levels which can have users or groups attached to them. You can define the level of security for the issues while creating or editing a topic.
So, there is a Default Permission Scheme any new projects that are created will be assigned to this scheme. Permission Schemes provide you to create a set of permissions and use this set of consent to any project.
System Administration
Unique of the useful features that JIRA admin gives to users are:
- Audit Log
- Following Audit Log, you can view all the details about the issue created and the changes made in the issues.
- Issue Linking
- That will show whether your issues link with any other issue that is already existing or created in the plan also you can de-activate the Issue linking of the panel itself.
- Mail-in JIRA
- Managing the Mail system in admin, you can mail problems to an account on a POP or IMAP mail server and messages written to the file system generated with an external mail service.
- Events
- An event details the status, the default template, notification scheme, plus workflow transition post function associations for the event. The events are classified into a System event (JIRA defined events) and a Custom event (User-defined events).
- Watch list
- JIRA gives lets you watch a particular issue, which informs you about the notifications of any updates relating to that problem. To watch a topic, next click on the word “watch” in the issue window, also if you want to understand who is watching your issues, you have to click on the number in brackets.
- Issue Collectors
- While the form of JIRA issues, an issue collector provides you to gather feedback on any website. During administration, if you click on Issue collectors, an option will open requesting Add Issue Collector. Once you have configured the looks and feel of an Issue Collector, set the generated JavaScript in each website for feedback.
- Development Tools
- You can also connect your Software developing tools to the JIRA tool using the admin function. You have to enter this URL of the application to communicate by JIRA.
How to create an issue in JIRA
JIRA Dashboard will start if you enter your user ID and password. Following the free JIRA dashboard, you will find the option Project. If you click at it, it will open a window that lists options like Simple Issue Tracking, Project Management, Jira Classic, Agile Kanban, and so on, as shown in the screenshot here.
If you click on the option Simple Issue Tracking, another window will open. You can discuss all the details about the issue and assign the issue to the responsible person.
If you click on the “Submit” button, a window will open wherever you can perform a list of work like creating issues, assigning issues, verify the status of issues like fixed, In-Progress, or closed, and so on.
Once this issue is created a pop-up will seem on your screen saying your issue is created successfully as shown in the screenshot.
If you need to edit an issue or export the issue to XML or Word document, you can hover your mouse on the foremost panel and click on Issues. Following the Issues options, click on search for issues that will open a window from where you can locate your issues and perform various functions.
If you want the “search for Issues” under Issues, a window will look as shown in the screenshot
- Search for issues selection will bring you to a window anywhere you can see the issues you like here, we have ST1 and ST2.
- Here within the screenshot, you can review the issue “Bug detected while User Acceptance Testing” and all the details associated with it. Of You can perform many tasks like you can stop the progress on issues, comment on the issues, edit the issues, assign issues, etc.
- Plus you can export issue details to an XML or Word document.
- You can also see activity going on the issue, reviews on the issue, work log, history of the issue, and so on.
- Following the time tracking option, you can even see the view time to fix the issues
You can set a filter for this issue in the same window and save them under Favorite Filters, so if you want to search or view a particular issue, you can locate it using the filter.
To see the review of the issue How to use Jira Software Tool for Beginners, you can click on choices summary, this will open a window that will show everything the details of your project and progress on this chart. At the right-hand side of the summary window, an Activity Stream provides the details about the issues and comments made by the assignee at the issue.
Sub-Task
Subtask issues are useful for breaking up a parent issue into more trivial tasks that can be assigned and tracked separately. This addresses issues more comprehensively and segregates the task into shorter chunks of tasks to do.
How to create Sub-Task
Sub-Task can be created in two ways
- Create sub-task below parent issue
- Creating an issue in a sub-task
To create a sub-task into JIRA, you have to choose an issue in which you want to select the sub-task. Following the issue window, click on the Assign more option, and then click on create sub-task as shown in the screenshot here. You can also choose to convert to sub-task under the same tab to convert the parent issue into a sub-task.
Once you click on the Create Sub-Task, a window will pop up to add a sub-task issue. Fill up the details about the sub-task also click on Create as shown in the below screen-shot, and that will create a sub-task for the parent issue.
That will create a sub-task under parent issues, and details will issue about when to end the task on this issue type page, as noted in the screenshot here. If you want to add more sub-task, you can click on the plus (+) sign on the sub-task panel corner. Furthermore, if you need to note down the time spent on the present task, click on (+) plus sign in the corner from the time tracking and put down the log sheet features.
Any crucial tips to remember while creating Sub-Task
- You can have as many sub-task as required below an Issue
- You cannot become a sub-task for a sub-task
- Once a sub-task is created following a parent, a parent cannot be converted into a sub-task
- Each sub-task can still be converted into a parent issue
- You can work on your sub-task without must navigating away of the parent issue
WorkFlows
How to use Jira Software Tool for Beginners a JIRA workflow is a collection of statuses and transitions that an issue goes through during its lifecycle. JIRA workflow includes five main stages once the issue is created.
- Open Issue
- Resolved Issue
- InProgress Issue
- ReOpened Issue
- Close Issue
While workflow in JIRA contains Statuses, assignee, resolution, conditions, validators, post functions, and properties
- Statuses: This describes the positions of the issues in a workflow
- Transitions: Transitions are the bridges in statuses, the process a particular issue moves from one status to different
- Assignee: The assignee dictates the effective party for any given issue and determines how the task would be performed
- Resolution: It describes how? an issue transitions of an open status to a finished one
- Conditions: Conditions control you can perform a transition
- Validators: It can assure that the transition can occur given the state of the issue
- Properties: JIRA recognizes any properties on transitions
You can select the status of the issue from the window itself, if you click on the check box to IN Progress status as shown in the screenshot here, it will show the status in the issue panel highlighted under yellow.
For this issue how to use Jira Software Tool for Beginners that we have created, JIRA will show a workflow that maps the project’s progress. As shown in the screenshot whatever status we have set in the Issue panel will be reflected in the Workflow chart. Here we must set the issue status in “Under Progress” and the same status is updated in the workflow, highlighted in yellow. Workflow can give a fast overview of the work below process.
Plug-ins in JIRA
There are plug-ins available to JIRA to work more efficiently, some of these plugins are Zendesk, GitHub, Salesforce, Gitbucket, and so on. Some of them enable the support team to report issues directly into JIRA, create unlimited private repositories with full-featured issue and test management support, etc.
JIRA Agile
Agile or Scrum method is generally used with development teams who follow a roadmap of planned features for upcoming product versions. Agile supports the same roadmaps to track their issues as in another JIRA ways To do -> In Progress -> Done, being shown in the screenshot here, we have one issue in To do also the second issue in Into Progress. Once this issue in In Progress will be fixed, it will move to Done status and in the same direction, the issue in To do will go to the next stage In Progress.
Creating an issue in Agile
To create an agile issue, go to the main menu under the Agile tab, click on “Getting Started”, click on it, and ask to create a new board for Scrum or Kanban’s issues. You can take your option as per your requirement, here we have selected the Scrum method.
How to create an Epic in Agile
While JIRA Agile, an epic is just an issue type. The epic captures a huge body of work. It is a great user story that can be broken down into some small stories. To make an epic, it may take several sprints. You can each create a new epic in agile or use the issue you have created in the normal JIRA board. Furthermore, you can also create a story for an agile scrum.
Plan Mode in Agile:
Plan mode displays everything the user stories created for the project. You can utilize the left-hand side menu to decide which issues want to be displayed. While at the right-hand side menu clicking on the issue, you can create subtasks, log work, etc.
Work Mode in Agile
It will display the active sprint information. Everything the issues or users’ stories will be displayed into three categories as given in the screenshot here To do, In Progress, and Done to show the project’s progress or issues.
Use of Clone and Link in JIRA
Into JIRA, you can also clone the issue. One benefit of cloning a problem is that the various team can work separately on the issue and quickly resolve the issue.
A different useful function is JIRA Link, which links provide you to create an association in two existing issues on each the same or different JIRA servers. While shown in the screenshot, we have connected the popular issue “ST-6 Drop down menu is not working” by another issue” ST-4 GUI is not responsive- retest GUI functions”.
We have set sprint for one day and will run sprint for that specific period as shown in the screenshot below. If you are working with scrum and prioritize the issue or rank the issue, you have to drag and drop the issue into the backlog.
Aside from this, there are many tasks that you can do. For instance, if you click on the right side corner from the window a list of functions will pop up to use it as per your want.
How to use Jira Software Tool for Beginners
Reports in JIRA
To track the process in Agile, a Burndown Chart gives the actual and expected amount of work to be completed in the sprint. A typical burndown chart will seem somewhat like that, wherever the red line indicates the actual task remaining while the blue line shows ideal task living during the scrum cycle.
Apart from the Burndown chart, there are different choices available in JIRA automation, such as Sprint Report, Epic Report, Velocity Chart, Version Report, Control Chart, and Cumulative flow diagram. You can also do different chart options to represent the process of your project.
Same here in the screenshot above, we have chosen a pie chart for issue priorities. This will generate a Pie Chart representing the priorities and hardness of the whole project’s percentage issues as shown below. You can view the pie chart from various perspectives like Assignee, Components, Priority, Issue Type, Resolution, Status, etc.
You can also configure how you need to view the scrum board. Scrum board gives various options in which you can make changes to your board appearance. You can configure multiple features using scrum: Columns, Swimlanes, Quick Filters, Card colors, etc. Here we have chosen column management and selected the options Issue count, and it will show the total number of problems in progress, to do or done. In column management, we can add columns as per our specification likewise there are different features that you can configure on the board.
Filters
You can also set filters different than default filters to filter the issues. The filters that you can utilize are date, priority, component, resolution, and so on.
Kanban Board and Managing issues
Same as the Agile Scrum board, we can further create a Kanban Board. Here we have created a plan name Cloud Testing. Kanban board is helpful for the team that manages and constraining their work in progress. Kanban boards are visible in Work mode however not in Plan mode.
Here we have produced an issue ” Bug detected while load testing” and “Check issues related to cloud server” into Kanban Board, as shown in the screenshot here. It also gives their status as well highlighted in red.
Kanban is considered the best methodology for bug fixing and maintenance release, where the incoming task is prioritized and then worked accordingly. Few measures can make Kanban more effective.
- Visualize your workflow
- Check the work in progress
- Work on Issues
- Measure the cycle time
JIRA Scrum vs. JIRA Kanban
Scrum
Kanban
Reports
Burndown Chart: The chart displays all the changes and scope changed while the sprint is but on. Other charts include Sprint Report, Epic Report, Velocity Chart, etc.
Reports
Control Chart: It provides you to measure the cycle time for issues, showing the meantime and actual time taken to complete issues
Agile Board
It provides the team to see the progress of sprints. That is the work mode, where you can see the board itself broken down into different statuses.
Constraints
The team can decide whether to increase or decrease the number of issues displayed in each status.
Backlog
This is wherever the team will plan sprints and estimate stories that will go into all sprints.
Workflow
You can map columns to these statuses of your workflow. Only by adding or removing columns, this workflow can be changed if needed.


 Using a Credit Card in 2022")

