
Did you suddenly get the Zoom Error 1132 while trying to sign in to the Zoom Account? Questioning what went wrong and watching for solutions, learn how to fix Zoom error code 1132 and can’t join meetings?
Zoom is a highly popular video conferencing app with more than millions of worldwide users. Many users are recently found complaining that zoom stops working with error code 1132 and cannot join the meeting.
Whereas some users are getting the error 1132 when they try to join the video meeting or sign in to their Zoom account.
“The meeting has an unexpected error. Error code: 1132” or
“Failed to sign in. Please try again. (Error Code: 1132)”
Well, the Zoom error code 1130 appears in different variations. However, it doesn’t matter how the error seems to check out the below-given fixes to eliminate the error 1130 in your Zoom account.
How to Fix Zoom Error Code 1132?
Table of Contents
- Solution 1 – Check for Internet Connection
- Solution 2 – Update Zoom
- Solution 3 – Update Windows 10
- Solution 4 – Use Zoom as a Browser Extension
- Solution 5 – Make new Windows & Zoom Accounts
- Solution 6 – Reinstall Zoom
- Solution 7 – Reset your PC
Solution 1 – Check for Internet Connection
This is the possible reason responsible for the Zoom Error 1132. So, make sure to check your internet connection is stable.
Additionally, you can restart your modem and router. Also, confirm you are running the latest router firmware version.
Moreover, first, turn off your device and unplug the network devices (modem and router) for one minute and plug them in again.
Now restart your system, launch the Zoom app, and check if the Zoom error 1132 is fixed or more head to the next solution.
Solution 2 – Update Zoom
Many users confirmed updating the Zoom app works for them to fix Zoom error 1132. Therefore, if you’re here, it is suggested to update your Zoom app. This will help you improve error code 1132 in Zoom and get the latest improvements.
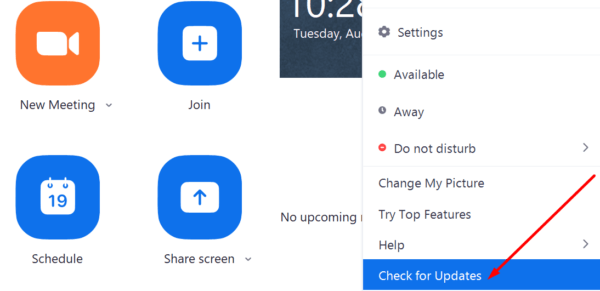
- To update Zoom, click on the username > and then go down > choose to Check for Updates
- Now click on install any pending updates > close Zoom and restart your computer.
Launch Zoom and check if Zoom error code 1132 appears or not
Solution 3 – Update Windows 10
Like Zoom, you also need to update your device in which you are running the Zoom app. So, make sure your device is updated.
To update your Windows 10 version, follow the steps given:
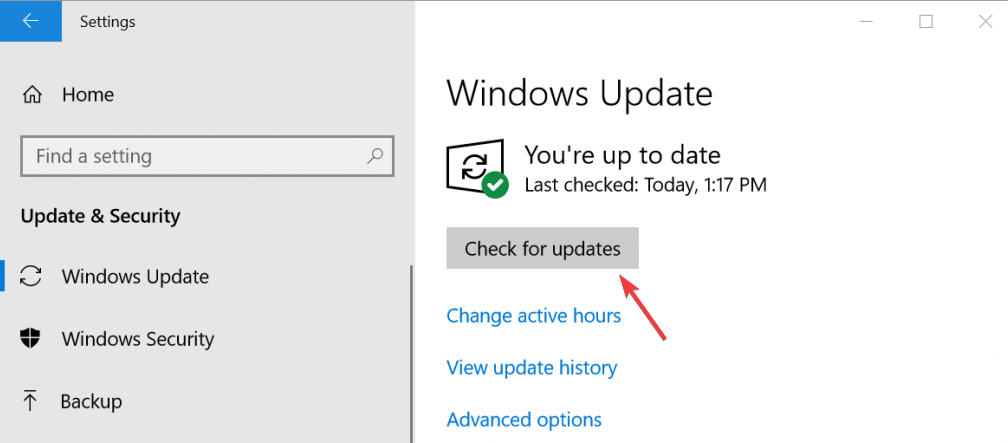
- Hit Windows + X now in the Settings window > select Update and Security icon
- Then choose the Windows Update tab > and click on Check for Updates
- And if any latest update is available, then install it.
And as the update is installed, restart your system and check if the Zoom error 1132 and you can’t join meetings is resolved or not.
Solution 4 – Use Zoom as a Browser Extension
If you can still join the meeting due to Zoom error code 1132, try adding Zoom as a Chrome extension or add-on. This acted for many users to fix the error.
If you are not utilizing the Chrome browser, you need to download and install it on your computer. Now to join the Zoom meeting from your browser, check the Join from your browser link from your Zoom account settings.
And it is estimated now the Zoom error code 1132 in Windows 10 is fixed.
Solution 5 – Make new Windows & Zoom Accounts.
Another solution you need to try is creating a new Windows account and a new Zoom account.
Follow the steps to create a new Windows users account:
- Press Windows + X > to open the Settings app
- Now go to Accounts > Family & other users > Add someone else to this PC options
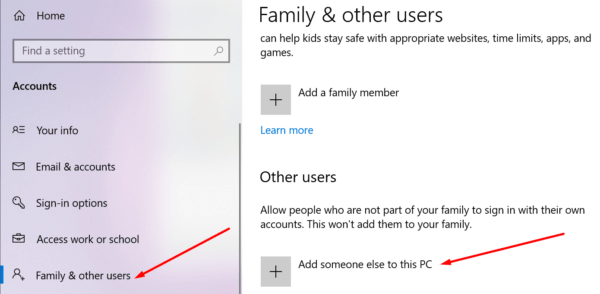
- Then click on I don’t have this person’s sign-in information > and Add a user without a Microsoft account
- Next, enter the new user name and password and follow the on-screen instructions for completing the account creation process.
After creating a new Windows account, first, try to use your old Zoom account, and if it doesn’t give access, then create a new Zoom account.
I hope this works for you to fix the Zoom error code 1132.
Solution 6 – Reinstall Zoom
If none of the above-given solutions works, try to uninstall and then reinstall the Zoom app.
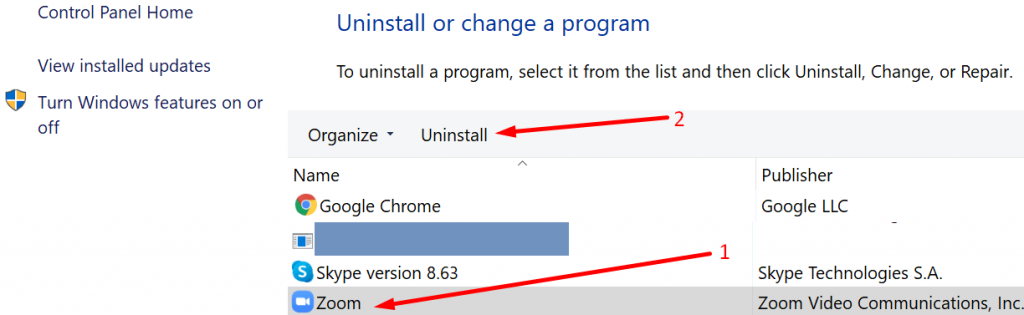
To uninstall Zoom go to Control Panel > Programs > Uninstall a program > choose Zoom > click the Uninstall button.
Now check if the Zoom error 1132 is fixed or not. If not, then here it is suggested to use a third-party uninstaller.
As manually uninstalling the app won’t delete it, some of its traces like junk files, registry entries are left behind. And while you install the app next time, it will cause conflict.
So, run the third party uninstalls to remove the app altogether.
Get Revo Uninstaller to Uninstall Zoom App Completely
Solution 7 – Reset your PC
This is the final solution that you can try if none of the above-given solutions works for you, try resetting your PC, but this may cause data loss.
So, first backup your data then try to reset your computer to avoid data loss. By resetting your PC, your Windows is reinstalled, and you need to decide if you want to keep the files or not.
And to use this option open Settings app > go to Update & Security > Recovery > Reset this PC.

Now follow the onscreen guidance to complete the process. Hopefully, now the Zoom error 1132 is fixed.
Simple Way to Optimize your Windows PC/Laptop Performance
If your Windows PC or laptop is working slow or causing some errors and issues, it is advised to scan your system with the PC Repair Tool.
This is a multifunctional tool that includes scanning and fixing various computer errors, removing malware, hardware failure, preventing file loss, and repairing the corrupted system files to speed up Windows PC performance.
By this, you can also fix other PC fatal errors, the same BSOD errors, DLL errors, repairing registry entries, runtime errors, and various others. You require to download and install the tool, and the rest work is performed automatically.
Go PC Repair Tool to fix PC errors & optimize its performance.
Conclusion:
So, this is all about the Zoom error code 1132. I tried my best to list down all the possible solutions to fix it fast on Windows 10.
All the solutions are tested and simple to follows, so make sure to following them accordingly until you see the one that works for you.
Hope this article work for you. Yet if there is anything that I missed out, then feel free to share it with us on our Facebook page.
Don’t ignore to follow us on social media handles to get extra exciting guides and essential tips to keep your computer secure from errors and issues.
Good Luck..! Have A Nice Day…


