

How to Fixed “There Is No Connected Camera” Error With Mac
If you are continually facing the issue ‘No Connected Camera’ while trying to launch FaceTime, when here’s your ‘how-to-fix’ guide! “There Is No Connected Camera” Error With Mac.
After tons of questions from several users, a complete guide about fixing the “There is no connected camera” error with Mac FaceTime or different camera apps. First, the video chatting application was not equipped with the possible feature set. Only now, with all updates, the app is getting steady and enriched with tons of functionalities.
For FaceTime activates automatically, I am hoping you aren’t wondering how to connect a Mac camera. Yet sometimes, the complete activation process fails, and you might see the annoying error message “There is not connected camera.”
How To Fixed ‘There is No Connected Camera’ Error On Mac?
There are a couple of methods to fix the annoying camera issue. Do follow them one by one to your problem becomes fixed.
METHOD 1. Restart Your MacBook
For beginners, you can fix the ‘Camera not connected’ problem with restarting your device correctly. The workaround has surely helped to fix many kinds of errors and issues on the MacBook. So, there’s a reasonable chance that it may fix your problem too. Try restarting your Mac all once in a while to check whether the issue has gone away or not. If it didn’t help, check out the following workaround!
METHOD 2. Run Series Of Terminal Commands
In this way, you want to run a series of command lines in the Terminal app to fix the ‘Camera no connected’ error at Mac while using the FaceTime application. To do so, follow these instructions here:
STEP 1- First of all, stop all the applications that need the Camera to work properly.
STEP 2- Once completed, go to the Applications > Uses > open Terminal application.
STEP 3- From the Terminal, you want to do the following command line and click on the Return button.
sudo killall VDCAssistant
STEP 4- Next, you want to type the command line:
sudo killall AppleCameraAssistant
STEP 5- Connect the Return button to complete the method.


You might have to provide the Admin password and relaunch the FaceTime and different camera apps to check whether this is working or not. Probably, the error message “There is no connected camera” should be fixed now.
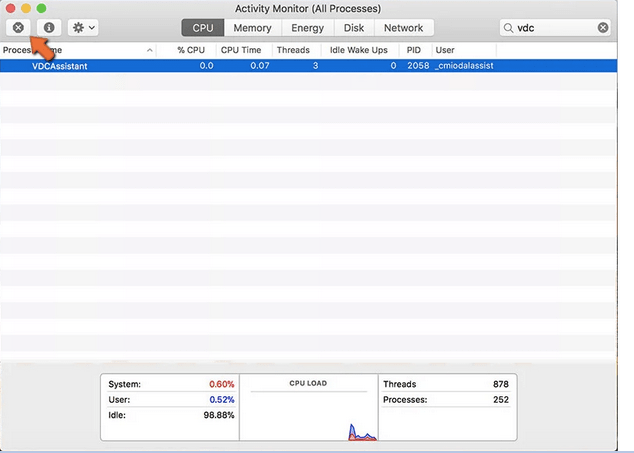
METHOD 3- Check Activity Monitor
End/quit all the applications which require a Fixed “There Is No Connected Camera” Error With camera to work. After that, each you have to do is:
STEP 1- Go to the Applications and find Uses.
STEP 2- Launch Activity Monitor and next click on the Method Name to sort everything alphabetically.
STEP 3- Once done, you want to find VDC Assistant and click on the same to open it.
STEP 4- Now hit the (X) button, located at the top-left corner of the screen, and close the program.

Alternatively, you want to check the Camera Privacy Settings and make necessary alterations to fix the “There is no connected camera” error at Mac.
- Navigate to the System Preferences.
- Continue to Security and Privacy.
- Click on the Privacy menu again.
- Hit Camera and look whether the application you are facing any issue with is not checked.
- Edit the list to allow your camera app.
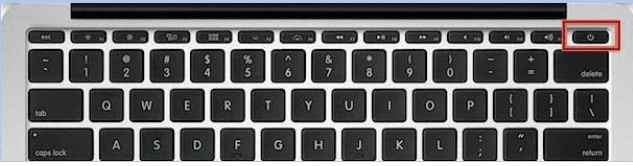
METHOD 4. Reset SMC
Well, if the problem ‘There is no connected camera’ persists, then you can try fixing the issue by resetting the SMC (System Management Controller) on your MacBook. To do so, first, you need to determine whether the battery is removable or not & then follow the steps accordingly:
For Non-Removable Battery Macs:
STEP 1- Click on the Apple menu and Shut down your system. Keep patience and wait for your Mac to shut down properly.
STEP 2- Press – SHIFT + CONTROL + OPTION and press the Power button simultaneously.
STEP 3- Make sure you hold the keys for at least 10 seconds.
STEP 4- Release the keys after some time and press the Power button again to turn on your Mac.
For Removable Battery Macs:
STEP 1- Shut down your Mac and remove your Mac’s battery. Alternatively, you can contact an Apple Authorized Service Provider for help.
STEP 2- Now press and hold the Power button for at least five seconds.
STEP 3- Insert the battery carefully and hit the Power button again to switch on your Mac.

This is how you have successfully reset the SMC on Mac. Check whether the error message ‘There is no connected camera’ is still occurring or not.
Lastly, it’s worth mentioning that you can also trigger the problem “Camera not connected” accidentally if you have disabled the built-in hardware camera by unintentionally moving a specific system component file required by the Camera to work properly. Doing so certainly breaks the Camera’s functioning, making it ‘not found’ or ‘unable to use’ for other Camera applications. So, keep a check on your Camera settings and make necessary changes.
If you know any other method to fix ‘There is no connected camera’ on Mac while using FaceTime or any other camera application, do mention them in the comments section here!


